Kit#: 7455.
Price: Can't Remember.
Decals: Two options.
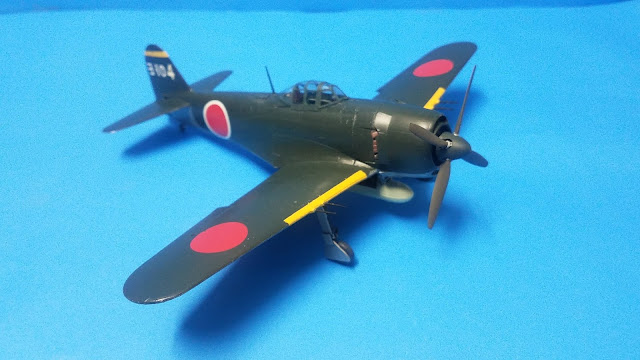
Notes: I used spare decals to make this kit as Kaneyoshi Mutoh's aircraft.
History:
From the instructions: "The Imperial Japanese Navy Air Force Shiden-kai was developed from the Navy Kyofu seaplane fighter. Replacing the floats of the Kyofu with a landing gear and fitting the airframe with the compact but powerful Nakajika Homare engine, the IJN fighter went into production in 1943 and was provisionally asigned to units in October 1944. The IJN, however, found a lot to be desired with the new fighter and it was sent back to the drafting tables, where modifications to the fuselage, main wing positioning and automatic combat flaps were added. The finished product was the intercepto Shiden-kai. The prototype made its maiden flight in January 1945..."
The kit:
Coming inside a top opening box, the parts are moulded in dark grey and clear plastic, and come bagged in two separate bags. Easy to follow instructions are included, albeit with a bit of broken English.
Decals offer options for two aircraft of the 301st Fighter Squadron:
1) N1K2-J "343-23" of Petty Officer 1st Class Tomokazu Kasai, April 1945, Kanoya Naval Air Base.
2) N1K2-J "343-22," April 1945, Kanoya Naval Air Base.
Both aircratf are painted in Dark Green uppers with natural metal undersides.
Construction:
I began construction on the cockpit. All the parts were painted in Interior Green, black and silver where appropriate. The cockpit is divided into two sidewalls and one floor. Once the cockpit was fully painted and dry, I glued all the pieces together, and left them aside.
Next step are the wings. Before closing them you have to add the wheel wells, which were painted in steel, according to the instructions. You also get the options of opening two small holes for the footstpes. Once the wells were installed, I glued the upper wings into the single lower wing.
Back to the cockpit, I glued it to the fuselage, together with the other fuselage half. After gluing both halves, I glued the wings and the horizontal stabilizers. The flaps were glued in the down position, since I thought the aircraft looked better with them that way.
With an almost fully complete aircraft, I began work on the engine and engine cowling. The engine face is glued into the cowling flaps, which can be posed in the open or closed position (I chose open). This is the stage in which you have to glue the exhausts to the cowling, then the cowling is glued into the nose of the plane. The engine was painted black, and then glued to the cowling flaps piece. The last part of the engine to be glued was the cowling.
Colours and Markings:
Kaneyoshi Mutoh's aircraft was painted in Dark Green over natural metal undersurfaces. I painted the upper surfaces with Revell's 40 Black Green, and the lower sides were painted first in grey (primer) and Revell 91 Steel. The aircraft was then glossed up for the decals.
I used a mix of decals from the kit and from other Japanese fighter spares, the Hinomarus came from the kit, the number 4s on the tail were masked (as well as I could) and painted white, and the other letters came from my 1:48 Zero and J2M3 Raiden (both too in 1:48). After that, the aircraft was matt coated.
Final Construction:
I painted the wheels and landing gear struts, the landing gear doors were painted too. The fuel tank was painted in the Japanese Grey Green colour, and the clear parts were the last pieces to be glued.
Conclusions:
This is another good kit from Hasegawa. It was a fun build without difficulties, and it left me yearning for more Japanese aircraft.


No hay comentarios:
Publicar un comentario