Mostrando entradas con la etiqueta eduard. Mostrar todas las entradas

viernes, 18 de septiembre de 2020

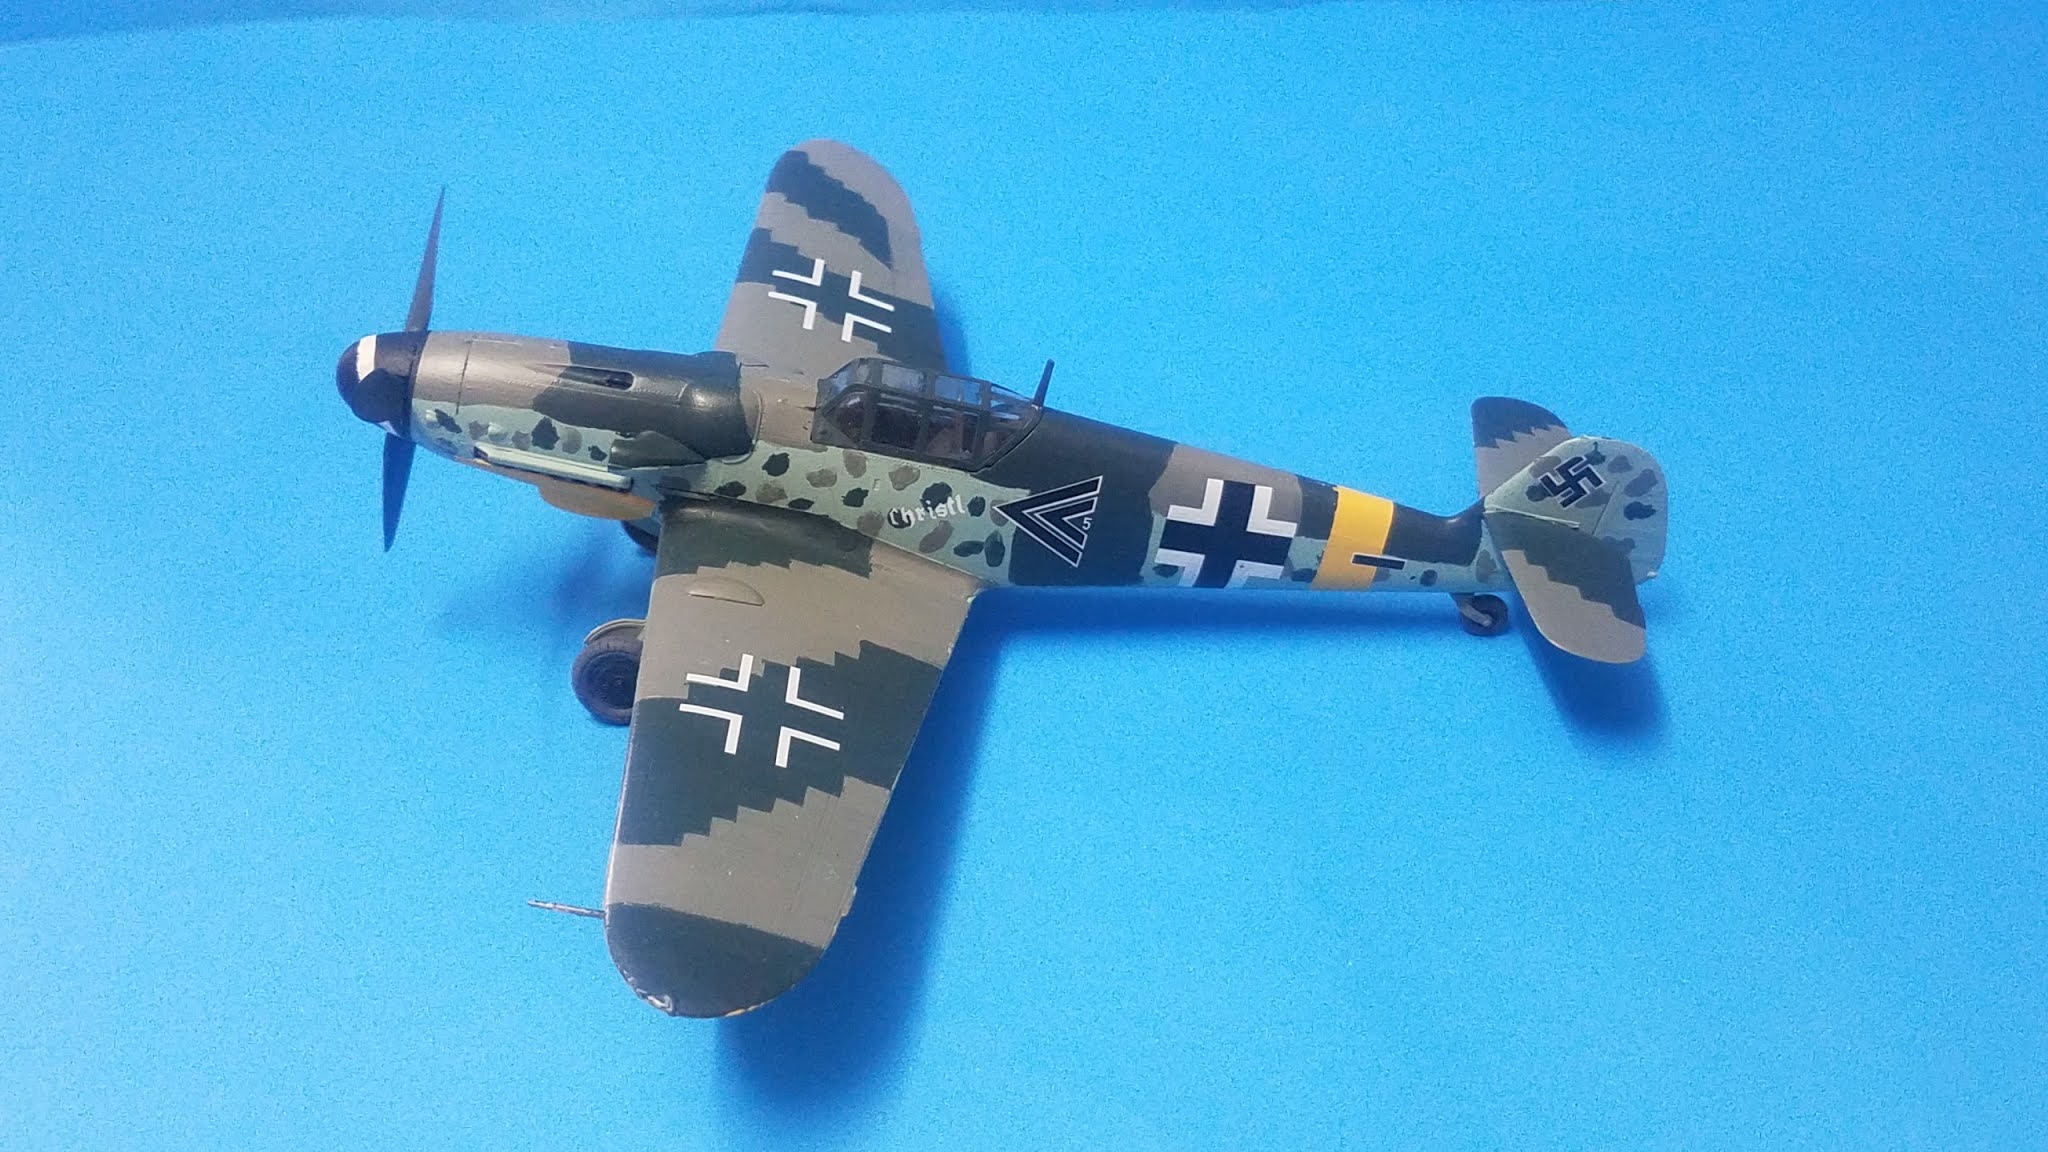
Hobby Boss 81751 Messerschmitt Bf 109G-6 (Gerhard Barkhorn)

Kit#: 81751.

Price: Can´t remember

Decals: Two options (Erich Hartmann and Gerhard Barkhorn).

Notes: Easy assembly Bf 109G-6.

History:

From the LET LET book about the Bf 109G: "The Bf 109G "Gustav" was the most important variant of the Bf 109. It was also built in the largest numbers, in particular during the last years of the war. The Gustav was fitted with the new Daimler Benz DB605 engine, giving 1475hp.

Externally the (early) Gustav was similar to the preceding "F" model. The most visible differences were the lack of the small triangular cockpit window and the addition of small air openings on each side of the nose.

The Bf 109G-6 was the most important Gustav version, and was built in the largest numbers. It could be fitted with a DB 605AM/AS or ASM engine. It was armed with two MG 131 machineguns in the nose and one MG 151/20 cannon firing through the propeller hub (this part wasn´t in the LET LET book). The Bf 109G-6/U4 was armed with a single MK 108 30mm cannon firing through the propeller hub, and had two MG 151/20 cannons fitted under the wings as the Bf 109G-6/R6.

This combination was regarded as the most suitable for daylight bomber interception, although it lacked the performances to meet Allied fighter escorts on even terms. 

Like the Bf 109G-5, the G-6 could be fitted with WGr 21 mortar launchers under the wings."


The Kit:

The kit has 78 pieces moulded in dark grey/clear plastic, and comes in four sprues of grey plastic and three clear ones (one has a solid canopy, the other one has a separate canopy, and the third one has a windscreen and the armoured headrest).

The kit has recessed panel lines, no flash, and is covered with tiny rivets that may make some people leave this model aside and go for the Hasegawa offering.

The instruction sheet comes as an 8-page booklet with 12 steps in black and white.


Construction:

I began by painting with Revell 78 all the cockpit parts and the fuselage of the aircraft. When the paint was dry, I began building the cockpit.

The cockpit is more or less detailed. I first attached the seat and the rudder pedals to the floor and then the trim wheel and the control stick. 

The control panel is the final step for the cockpit assembly, and it´s a three piece construction. It was build and left to dry before being glued to the cockpit floor.

Before adding the cockpit to the fuselage halves, one has to add what a small part of what I guess is the throttle to the left side of the fuselage. I glued it on, left it dry, and then added the cockpit. The cockpit didn´t fit. So I removed the little piece and put it on the box. You also have to glue the exhausts and make a hole for a circular antenna before closing the fuselage halves.

Step 3 is where I brain farted (too early, yeah I know) and, instead of glueing together pieces B8 and A17 to make the rear bulkhead (part B8 had two small notches for the headrest), I glued the incorrect part D8 (a single rear bulkhead piece) to one of the fuselage halves. 

With that added, I went ahead and glued both fuselage halves and left them to dry.

Step 4 deals with the addition of the horizontal stabilizers and cowlings, which maybe the easiet step of the entire build. I also glued the air intake at this time. The inner part of the cowlings (the ones that surround the exhaust) are some milimitres longer than the area where they have to be glued, so trim them a bit and test fit.

I skipped step 5 and went straight to 6, adding the oil cooler and the tailwheel cover at this time. I also built and painted the propeller assembly with the colours for Hartmann´s aircraft.

Steps 7 and 8 have you build the wings, and the instructions tell you to open holes for the underwing cannons and for the two kidney shaped pieces that allowed for the installation of bigger wheels in the real aircraft. The first ones weren´t opened because there weren´t any underwing cannons on Hartmann´s aircraft, and the latter ones were already open, so I glued those two pieces without hesitation. Do not glue piece D10 (I guess it´s a fuel tank), it won´t let the wing assembly seat flush with the fuselage.

I jumped above steps 9 to 11 because they dealt with the installation of the fuel tank (again, not applicable for Hartmann´s aircraft) and the landing gear, and went straight to painting.


Colours and markings:

Instead of using the inaccurate painting instructions of the kit, I chose to use the ones that came on the Eduard Bf 109G Royal Class kit, which has decals too for Barkhorn's aircraft. Since the aircraft was built by Erla in 1943, the place was painted with the saw-toothed camouflage pattern. I first painted the fuselage with RLM 74/75/76, and after it had dried, I painted the wings entirely with RLM 75, and then I traced with a pencil the saw tooth RLM 74 camo. Since the RLM 74 is darker than the RLM 75, I was able to cover those areas in three coats, leaving no trace of paint ridges on the wings. With the painting stage completed, I glossed the aircraft for the decals.

I used the kit decals, following the instructions of the Eduard kit. They performed well without using Microsol, but I used a bit just to be sure.

Final construction:

With the aircraft decalled, I brused two coats of Revell´s flat varnish and left it to dry.

The landing gear came next, and it doesn´t have a very positive attachment point, only a pin over a hole, so you´ll have to hold it until the glue sets. Once both gears were dry, I glued the tailwheel, the main gear doors, and the propeller.

The canopy was the last part to be added. It was painted in RLM 75 and later glued with clear glue to the cockpit opening.

The small aileron mass balances were left on their sprue because I didn´t want to lose them, should I ever move my model from my shelf.


Conclusions:

Another easy assembly 109 for the collection. I really like these Hobby Boss kits, one can build many of them at the price of one Tamiya 109G-6 (even though the Tamiya kit is far superior).

References:

http://www.letletlet-warplanes.com/wp-content/uploads/2014/11/Bf109G.pdf


Hasegawa 7455 Kawanishi N1K2-J Shiden-kai "301st Fighter Squadron" (Kaneyoshi Mutoh)

Kit#: 7455.

Price: Can't Remember.

Decals: Two options.

Notes: I used spare decals to make this kit as Kaneyoshi Mutoh's aircraft.

History:

From the instructions: "The Imperial Japanese Navy Air Force Shiden-kai was developed from the Navy Kyofu seaplane fighter. Replacing the floats of the Kyofu with a landing gear and fitting the airframe with the compact but powerful Nakajika Homare engine, the IJN fighter went into production in 1943 and was provisionally asigned to units in October 1944. The IJN, however, found a lot to be desired with the new fighter and it was sent back to the drafting tables, where modifications to the fuselage, main wing positioning and automatic combat flaps were added. The finished product was the intercepto Shiden-kai. The prototype made its maiden flight in January 1945..."

The kit:

Coming inside a top opening box, the parts are moulded in dark grey and clear plastic, and come bagged in two separate bags. Easy to follow instructions are included, albeit with a bit of broken English.

Decals offer options for two aircraft of the 301st Fighter Squadron:

1) N1K2-J "343-23" of Petty Officer 1st Class Tomokazu Kasai, April 1945, Kanoya Naval Air Base.

2) N1K2-J "343-22," April 1945, Kanoya Naval Air Base.

Both aircratf are painted in Dark Green uppers with natural metal undersides.

Construction:

I began construction on the cockpit. All the parts were painted in Interior Green, black and silver where appropriate. The cockpit is divided into two sidewalls and one floor. Once the cockpit was fully painted and dry, I glued all the pieces together, and left them aside.

Next step are the wings. Before closing them you have to add the wheel wells, which were painted in steel, according to the instructions. You also get the options of opening two small holes for the footstpes. Once the wells were installed, I glued the upper wings into the single lower wing. 

Back to the cockpit, I glued it to the fuselage, together with the other fuselage half. After gluing both halves, I glued the wings and the horizontal stabilizers. The flaps were glued in the down position, since I thought the aircraft looked better with them that way.

With an almost fully complete aircraft, I began work on the engine and engine cowling. The engine face is glued into the cowling flaps, which can be posed in the open or closed position (I chose open). This is the stage in which you have to glue the exhausts to the cowling, then the cowling is glued into the nose of the plane. The engine was painted black, and then glued to the cowling flaps piece. The last part of the engine to be glued was the cowling.

Colours and Markings:

Kaneyoshi Mutoh's aircraft was painted in Dark Green over natural metal undersurfaces. I painted the upper surfaces with Revell's 40 Black Green, and the lower sides were painted first in grey (primer) and Revell 91 Steel. The aircraft was then glossed up for the decals.

I used a mix of decals from the kit and from other Japanese fighter spares, the Hinomarus came from the kit, the number 4s on the tail were masked (as well as I could) and painted white, and the other letters came from my 1:48 Zero and J2M3 Raiden (both too in 1:48). After that, the aircraft was matt coated.

Final Construction:

I painted the wheels and landing gear struts, the landing gear doors were painted too. The fuel tank was painted in the Japanese Grey Green colour, and the clear parts were the last pieces to be glued.

Conclusions:

This is another good kit from Hasegawa. It was a fun build without difficulties, and it left me yearning for more Japanese aircraft.


jueves, 17 de septiembre de 2020

Hasegawa 9846 Kyushu J7W2 Interceptor Fighter Shindenkai "Jet Version" (302nd Naval Flying Group, 1947)

Kit#: 9846.

Price: Can't remember.

Decals: Two Options.

Notes: Includes resin pieces to transform the J7W1 into the J7W2.

History:

From the kit's instructions: "In May 1944, the Kyushu Aircraft of Japan received an order from the Imperial Navy for a trial manufacture of the 18-shi (experimental) Interceptor that became known as the J7W1 Shinden, and Lieutenant M. Tsuruno of the Naval Aviation Technology Centre was appointed as designer in chief. Higher maneuverability and high speed were required for this aircraft to fight against the heavy bombers of the Allies. To comply with such demands, contrary to the usual aircraft, the propeller was located at the tail, main wings moved to the rear, and a pair of small horizontal fins called canards were located on the nose. This distinctive design allowed it a remarcable reduction in weight, resulting from the smaller main wings by the additional lift proveded by the canards. And without the propeller in front, weapons could be located in the nose for more efficient attacks.

Following the completion of the first prototype in June 1945, there were three test flights on August 3rd, 6th and 8th of 1945, and recorded a total of 45 minute flight. However, the war was over in the following days and the Shinden did not see any actual battle.

The Imperial Japanese Navy, encouraged by the previous success of its propeller driven Shinden prototype, had plans to build a jet powered Shinden Kai, but historians haven't been able to ascertain exactly how far along this project was at war's end."

The Kit:

Originally released in 1981, the kit has stood the test of time perfectly. It´s molded in light grey plastic with fine raised panel lines, no flash, a nicely detailed cockpit, and comes with the figure of a standing pilot. A label "Made in Japan" is displayed proudly on one of the sprues. One of the good parts of this kit is that you can leave the propeller assembly and the canards off the model until after painting and decalling, in case you need to add more weight in front of the aircraft. The landing gear is also long and skinny, and is wobbly and fragile as a consequence, so let it thoroughly dry before placing the aircraft on its wheels, and don´t go around moving it too much after that.

To convert the regular propeller driven Shinden into the Jet powered version, Hasegawa included three resin parts for the air intakes and the jet nozzle. There're also several optional armaments and fuel tanks included as new parts on this kit to embelish the undersides of the aircraft.

There're two decal options included in this kit:

1) Japanese Navy, 302nd Naval Flying Group, 1947. Painted in IJN Dark Green over IJN Green.

2) Luftwaffe, 1947. Painted in RLM 81/82/76.

Construction:

I had decided early on to build this Shinden as the propeller driven version instead of the jet powered one, so I left the resin parts inside the box and used the air intakes needed for the J7W1.

I began by painting the control stick, cockpit tub, rudder pedals and cockpit framing with Revell Sea Green 48 (the colour callouts mentioned "Interior Green"). I painted the instrument panel and the oxygen bottles flat black, and another bottle in red. The grip of the control stick was also painted black after the interior green had dried, and the rudder pedals were over painted with silver. The complete cockpit was then glued into one fuselage half.

With the cockpit in place, I began to ponder how and where should I add the nose weight. Hasegawa recommends to place 1g as forward as possible in the nose, but I chose to add 10g above the nose gear well.  Since the shape of the nose gear well ends up in an angle, I glued two cut sprues to the sides, let them dry, and glued the weight after that. The nose gear well was then glued in place. 

I then decided to glue the fuselage halves. I first test fitted them, to see if there would be any troublesome areas, and after checking there were none, I glued and taped both of them together. While the fuselage was drying, I thought I wouldn´t have enough weight in front of the nose, so I glued a smaller weight to the nose gear well.

I set the fuselage to one side and began to work on the wings. These are the usual single lower half and two separate upper halves. They were glued together and left to dry for some minutes. After that, the two vertical stabilisers were glued to the wing. These are a loose fit, and will have to be held until the glue dries enough for them to be left hanging alone.

I concentrated on the canards by gluing the two separate guns. I left this piece aside until the end.

I mated the fuselage and the wings together, a simple assembly with a nice fit. This left me basically with the complete airframe, sans the engine and the other parts. With the aircraft in this stage, I went to the paint shop.

Colours and Markings:

I painted the upper surfaces with RLM 70, and the lower ones with RAF Duck Egg Blue, since to me it looked the same as the late green used by the Japanese Army and Navy Air Force late in the war. Then I painted the yellow leading edge ID bands, left them to dry, and then glossed the entire aircraft to prepare it for the decals.

I chose to use the Japanese option, just because I liked it more than the German one. When finished, I matt coated the aircraft and left it to dry.

Final Construction:

After decalling, I glued the landing gear struts in place. These are long, skinny, and won´t resist much movement, so once the model is on its wheels, one should leave it alone. Before proceeding further, I left the landing gear legs to dry thorouhgly before adding the wheels.

While the aircraft was lying upside down with the landing gear drying, I built the propeller assembly. The engine front plate was painted with the fuselage colours, and internally painted silver. Then the propeller shaft was added and trapped by adding a circular piece that glues to the back of the engine plate (don´t glue the shaft to the circular piece if you want the propeller to spin). The propeller was glued to its backing plate, and then the spinner was glued to the backing plate. I put CA into the propeller hole and then pushed it into the propeller shaft, securing me a spinning propeller.

I glued the wheels to the landing gear, and then added the landing gear doors. I next glued the propeller assembly, and with a bit of fear, I put the aircraft over its wheels, and it didn´t colapse. However, the main landing gear struts did flex a bit forward, and to secure them, I cut two toothpicks, and CA glued them to the base the main landing gears, preventing them from moving forward. Since the weight I had added earlier was enough, I glued the canards in place.

Before completing the plane, I painted the clear parts. After cleaning them up, I dry fitted them, and glued them with Revell Contacta Clear.

Conclusions:

The Shinden has to be my favourite WW2 Japanese aircraft, I´ll for sure buy some more when I come across them. The landing gear may look weak, but letting it dry properly and adding the pegs at the base will make it sturdier.

References:

Kit instructions.


Tiger Models 102 Nakajima Ki-84 "Hayate"

Kit#: 102.

Price: Can't remember.

Decals: One option.

Notes: Includes decals and stickers for the markings.

History:

From Wikipedia: "The Nakajima Ki-84 Hayate is a single-seat fighter flown by the Imperial Japanese Army Air Service in the last two years of World War II. The Allied reporting name was "Frank"; the Japanese Army designation was Army Type 4 Fighter. The Ki-84 is generally considered the best Japanese fighter to operate in large numbers during the conflict. The aircraft boasted high speeds and excellent maneuverability with an armament (up to two 30 mm and two 20 mm cannon) that gave it formidable firepower. The Ki-84's performance matched that of any single-engine Allied fighter it faced, and its operational ceiling enabled it to intercept high-flying B-29 Superfortress bombers. Pilots and crews in the field learned to take care with the plane's high-maintenance Nakajima Homare engine and a landing gear prone to buckling. The difficulties of Japan's situation late in the war took a toll on the aircraft's field performance as manufacturing defects multiplied, quality fuel proved difficult to procure and experienced pilots grew scarce. Nevertheless, a well-maintained Ki-84 was Japan's fastest fighter. A total of 3,514 aircraft were built."

The Kit:

This kit is one of several egg planes done by Tiger Models. The sprues were bagged in four separate bags. Parts are moulded in dark green and clear plastic. A single full colour instruction sheet is included with the model, and there's only one decal/sticker option.

Construction:

This kit was really simple, five construction steps and one painting and decalling section. I began by painting all the cockpit parts (seat, instrument panel and control stick) in Interior Green and black respectively. Then I glued all the pieces together and place the cockpit inside the fuselage. I next assembled the propeller and placed it in front of the cockpit. I also glued the tailwheel into place. 

When I tried to close the fuselage, I realised I had put the engine askewed, so I had to force it into place, while at the same time breaking the propeller shaft. Disappointed but not discouraged, I went on, knowing I'd be able to glue the prop back with CA.

The wings were assembled next, but I deviated a bit from the instructions and glued the ailerons in place (they can be placed without glue so they can move freely). After that, I glued the wing into the fuselage.

Colours and Markings:

The painting instructions indicated me to paint this kit with Japanese Army Green and Japanese Army Grey for the upper and lower surfaces. Not having any of those colours, I chose to use RLM 70 and Duck Egg Blue for the upper and lower surfaces. I then painted the yellow leading edge ID bands and painted the guns black. The exhausts were painted with Revell's 83 Rust. I then glossed the aircraft for the decals. 

There were only 8 decals for this model, and all performed well with the use of some Microsol.

Final Construction:

I painted the landing gear and the fuel tanks, which were then placed in their respective places after the paint was dry. The propeller was also glue in place with CA. The clear parts were also painted and place over the cockpit.

Conclusions:

My first egg plane. It was a fun build between more serious projects. I'll make sure to pick some more if I ever find them.

References:

https://en.wikipedia.org/wiki/Nakajima_Ki-84


martes, 15 de septiembre de 2020

Hasegawa 9965 Focke Wulf Fw 190A-6/R2 "Sturmstaffel 1" (Hans Günther von Kornatzki)

Kit#: 9965.

Price: 27$

Decals: Three options.

Notes: One of the many reboxings of the Hasegawa Fw 190.

History:

From the instructions: "The Fw 190 was developed to support the Luftwaffe's mainstay Bf 109 fighter. Its radial engine was a design feature rare in European fighters at the time. The 190's sturdy airframe, high maneuverability and the fortuitous marriage of a logical  overall design with raw horsepower made for a fighter with the frontline staying power to fight right through to the end of the war, as is evidenced by the many modifications and models of Fw 190s produced practically right up until the cessation of hostilities.

The Fw 190A-6 was basically an A-5 with upgraded armament. Externally distinguishable characteristis of the new type were the replacement of the MG FF machineguns on the outer wing postion with MG151/20 cannon, and the fitting of a BSK16 gun camera on the leading edge of the left wing. Radio equipment was the FuG16Z-E, with a direction finding loop antenna installed on the lower surface of the rear fuselage. The MG151/20 was superior to the MF FF in rate of fire, ballistic performance and range, and the cannon afforded a considerable improvement in overall firepower. 

Production of the A-6 began in Spring 1943, with a total run of 569 aircraft. 

Besides the "R" field modification, some A-6s featured radar for use in night fighter role, bulletproof glass, and a special anti bomber interceptor with extensive armour upgrades.

The Kit:

The parts come in two separate bags, one for the main sprues and another one for the clear parts and the polycaps. All of them are molded in dark grey, hard plastic.

There're three decal options included in the kit:

1) Erwin Bacsila's Fw 190A-6/R2 "White 7". Painted in RLM 74/75/76 with yellow lower cowling.

2) Hans Günther von Kornatzki's Fw 190A-6/R2 "White 20". Painted as above.

3) Fw 190A-6/R2 "White 2". Painted as above.

Construction:

It all began with the cockpit, I painted it in RLM 66 (Revell 78) with a black instrumentl panel and silver rudder pedals. The fuselage halves walls were painted in RLM 66 too, and when dry, the cockpit was glued in place.

After finishing the cockpit, I built uo the main spar for the wings. These pieces were painted in RLM 02 (Revell 45), left to dry, and then glued to the lower wing. Before closing the wing halves, I opened the appropriate holes for the cannon installation. Any gaps remaining of that surgery were filled with CA and sanded.

Next came the engine. The only thing you can see on an Fw 190 engine, as long as you don´t open the cowlings, is the cooling fan, so I painted it in silver and put it in place with the rear propeller hub (piece E13). I then built the engine cowling, and glued it in place. Before gluing the last parts, I installed the lateral armour plates that characterised the Sturmstaffel 1 machine.

After that, I glued the wings and horizontal stabilizers in place, and I prepared to paint the aircraft.

Colours and Markings:

I decided to paint this machine as Hans Günther von Kornatzki´s aircraft. I painted the fuselage with RLM 74 (Revell 69) and RLM 75 (Revell 47), and when those colours were dry, I painted the fuselage in RLM 76 (Revell 49). Then the wings were painted with the same colours, and the aircratf was then gloss coated for decalling.

Decals behaved nicely, and I had a fully decalled aircraft in less than 2 hours. I then left the aircraft´s decals to dry for a period of 24 hours. Then, the model was matt coated.

Final Construction:

I painted the landing gear struts in RLM 02, the wheels with black hubs and RLM 66 tyres, and the propeller in RLM 70. The guns were painted black on the sprues and the added to the aircraft. The clear parts were the last pieces to be added, but the real final pieces were the thicker glass for the canopy.

Conclusion:

Another good kit from Hasegawa, I didn´t experience any issues when building it.


Tamiya 61050 Messerschmitt Bf 109E-3 (Adolf Galland)

Kit#: 61050.

Price: Can´t remember.

Decals: Three options.

Notes: Great fitting kit.

History:

From the kit's instructions: "Without a doubt, the Messerschmitt Bf 109 can be claimed as the most famous and successful German fighter aircraft of WW2. It was the world's most advanced fighter at the time of its debut in 1936, and remained as the standard fighter for the Luftwaffe throughout the conflict.

Created by the brilliang engineer Willy Messerschmitt, it had the smallest possible airframe built around the most powerful engine available. It also boasted many of the then innovative features such as an all metal stressed skin construction, retractable main landing gear, automatic Handley-Page leading edge slats, etc...

The Bf 109 saw first combat during the Spanish Civil War and fully demonstrated its exceptional maneuverability, inherited from its precedent Bf 108 Taifun multi purpose sports plane.

The Bf 109 underwent numerous improvements throughout its career, and mass production of the E variant started late in 1939. Within one year, about 2000 "E" aircraft rolled out.

Its excelletn performance contributed greatly in the active service of German pilots at the Western Front and during the Battle of Britain. 

The E-3 version used an improved Daimler Benz DB601Aa engine capable of 1100hp output. This engine had provision for mounting a 20mm MG FF cannon on the crankcase and firing through the propeller hub. 

The Messerschmitt Bf 109E was one of the best fighters of the early World War 2 period, on part with the British Spitfire."

The Kit:

Coming inside a top opening box, the kit parts come bagged inside a single bag, with the clear parts and polycaps coming inside another bag. Instructions are of the typical 1:48 Tamiya style, being foldable and easy to follow.

There're three decal options included in the kit:

1) Adolf Galland's Bf 109E-3 "Double Chevron and Bar", III/JG26 August 1940, France. Painted in RLM 02/71/65.

2) Bf 109E-3 "White 3 and Bars", II/JG77, October 1940, Norway. Painted as above.

3) Bf 109E-3 "Single Chevron", II/JG54, Autumn 1940, France. Painted as above with mottling.

Construction:

Construction began, not surprisingly, in the cockpit. I painted all the parts in RLM 02 (Revell 45), with the instrument panel being painted in black, and the rudder pedals being painted in silver. It was at this time that I separated the cockpit halves from their sprue and painted the walls in RLM 02 too, with many of the small details being picked up in black. After the cockpit parts were dry, I glued them together, and then glued the full cockpit to one fuselage half. This was later followed by the other half, and then I glued the exhausts and the cooler intake.

With the fuselage done, I set on to build the wings. The wings are diveded into the top and bottom halves. I glued them first, and then glued the flaps in the down position. The slats came next, these were glued too in the down position. With the wings complete, I glued them to the fuselage, and left them to dry. While the wings were setting, I glued the horizontal stabilizers and their struts (breaking one in the process), and glued the rudder too. I left the virtually complete aircraft to dry before going to the painting stage.

Colours and Markings:

I had decided early on to paint this aircraf as Adolf Galland's machine. I first outlined the colours with a pencil, and then painted the RLM 71. After the 71 was dry, I painted the RLM 02. I then painted the RLM 65 on the fuselage. I did the same to the wings, and erased any remaining paint ridges with a fine sandpaper. I then glossed the entire aircraft to prepare it for the decals.

Decals behaved OK. They were a bit thick, but placing them first inside hot water managed to soften them quite a bit, and they moderatly conformed to the panel lines. I then matt coated the entire aircraft.

Final Construction:

This stage is always the one that takes more time. I painted the landing gear struts in RLM 02, the wheels in black and tyres with RLM66. The propeller was painted in RLM 70 (Revell 40) with silver in the hub, and later I built it up and glued it together. The last parts to be added were the clear parts. These were painted with the fuselage colours and glued to the aircraft with Revell's Contacta Clear.

Conclusions:

Both the Tamiya and Airfix kits are similar regarding the construction and the options provided. However, the Tamiya kit has the upper hand regarding fit and ease of assembly.


lunes, 14 de septiembre de 2020

Hasegawa JT79 Supermarine Spitfire Mk.IX (Pierre Clostermann)

Kit#: JT79.

Price: Can´t remember.

Decals: Two options.

Notes: Eduard decals used for Pierre Clostermann's aircraft.

History:

From the kit's instructions: "The Mk.VI and Mk.VII Spitfires were special high altitude capable aircraft equipped with pressurised cabin cockpits. Developed to counter a perceived threat by German high altitude bombers, the need for these specialised Spits was negated when the German bomber threat never materialised. The pressurised cabin gear for these aircraft was subsequently removed, resulting in a new type, the Spitfire Mk.VIII.

When production of these aircraft proved to be too slow to face the growing threat from the German Fw 190A, the Mk.IX was rushed off the drawing boards to replace it. The Mk.IX was built around a slightly modified Mk.Vc fuselage and powered by the Merlin 61 engine. The first production model rolled off the assembly lines in June 1942, with production of all models of the Mk.IX reaching nearly 5600 aircraft by the end of production in June 1945..."

The Kit:

The kit comes inside a top opening box. All the parts are moulded in a dark grey hard plastic, bagged inside a single bag. The clear parts and polycaps came inside their own bag to avoid scratching.

Decals are provided for two aircraft:

1) Spitfire Mk.IX of RAF 316th Squadron.

2) Spitfire Mk.IX of RAF 443rd Squadron.

Both of them are painted in the standard late war RAF camo of Extra Dark Sea Grey, Dark Green and Medium Grey, with yellow ID bands on the leading edge of the wings.

Construction:

Before starting the build, I checked the instructions of the Eduard Spit Mk.IX to see if there were any differences between it and the Hase kit for the decal option I chose. The only difference was in the wings, Hasegawa includes four extra bulges that are missing on Clostermann's machine. These were deleted with a sharp blade, and all the imperfections were sanded and filled with CA. The wings were then built and left aside, while I worked on the cockpit.

The cockpit is were the instructions actually tell you to start the kit. I painted all the parts with Interior Green (Revell 48), with many of the smaller detail parts in black. The parts were all glued together after the paint had dried, and the cockpit was glued to one side of the fuselage, which subsequently was trapped when I glued the other half of the fuselage in place.

With the fuselage complete, I glued the wings, horizontal stabilizers and rudder to the fuselage assembly, which were left alone for the glue to cure.

Colours and Markings:

Pierre Clostermann's aircraft (LOoD) isn't any different regarding the camouflage, Extra Dark Sea Grey and Dark Green on top with Medium Grey on the lower sides. I painted first the EDSG (Revell 79 Grey Blue), then came the DG (Revell 68 RAF Dark Green), and finally I painted the Medium Grey (Revell 57). After painting, I painted the D-Day stripes on the lower half of the wings and on the fuselage. After that, the aircraft received two coats of Revell's gloss varnish.

I used a mix of Hasegawa and Eduard decals, Hasegawa provided the national markings, while Eduard provided the personal markings for Clostermann's machine. After the decals were dry, I gave the aircraft two coats of Revell's matt varnish.

Final Construction:

I painted the landing gear struts in aluminium, the tyres were painted with RLM 66 and the hubs painted in aluminium. The propeller was painted in black with yellow tips, and the guns were finally added. The final bits to attach were the gunsight and the canopy parts.

Conclusions:

Although outclassed by Eduard's Spitfire in 48th scale, the Hasegawa kit is still a viable option.

References:

Instructions.